Ultimate Guide to Bulk Mailbox Provisioning 2026
If you send cold email at scale, your setup can help inbox placement or wreck it before campaign day one. I’d keep it simple: use secondary domains, set SPF/DKIM/DMARC before sending, limit each domain to 3–4 mailboxes, warm new inboxes for about 4 weeks, and watch bounce rate, complaint rate, and inbox placement every week.
Here’s the short version:
- I would never use the primary business domain for cold outreach.
- I would buy secondary
.comdomains 30+ days before warm-up. - I would keep sending spread across 2–4 mailboxes per domain.
- I would start DMARC at
p=none, then move to stricter policy after reports look clean. - I would cap new inboxes at about 30–50 cold emails per day.
- I would keep bounce rate under 2%, spam complaints under 0.1%, and aim for 80%+ inbox placement.
- I would retire weak inboxes fast and keep a 25%–40% reserve ready.
This guide shows that bulk mailbox provisioning is not just “buy inboxes and send.” It’s a stack made up of domain planning, DNS setup, mailbox creation, warm-up, sending limits, and access control. If even one part is sloppy, the whole system can slip.
How I Setup My Cold Email Mailboxes [Makes Me $600K/mo]
Quick comparison
| Part | What I’d do | Target / Rule |
|---|---|---|
| Domains | Use secondary brand-close .com domains | No cold email from primary domain |
| Mailbox density | Spread risk across domains | 3–4 mailboxes per domain |
| DNS | Set SPF, DKIM, DMARC before sending | One SPF record per domain |
| Warm-up | Start slow on new inboxes | About 4 weeks |
| Sending volume | Keep daily volume low on new mailboxes | 30–50 emails/day |
| Health checks | Track failures early | Bounce < 2%, complaints < 0.1% |
| Backup pool | Keep extra inboxes ready | 25%–40% reserve |
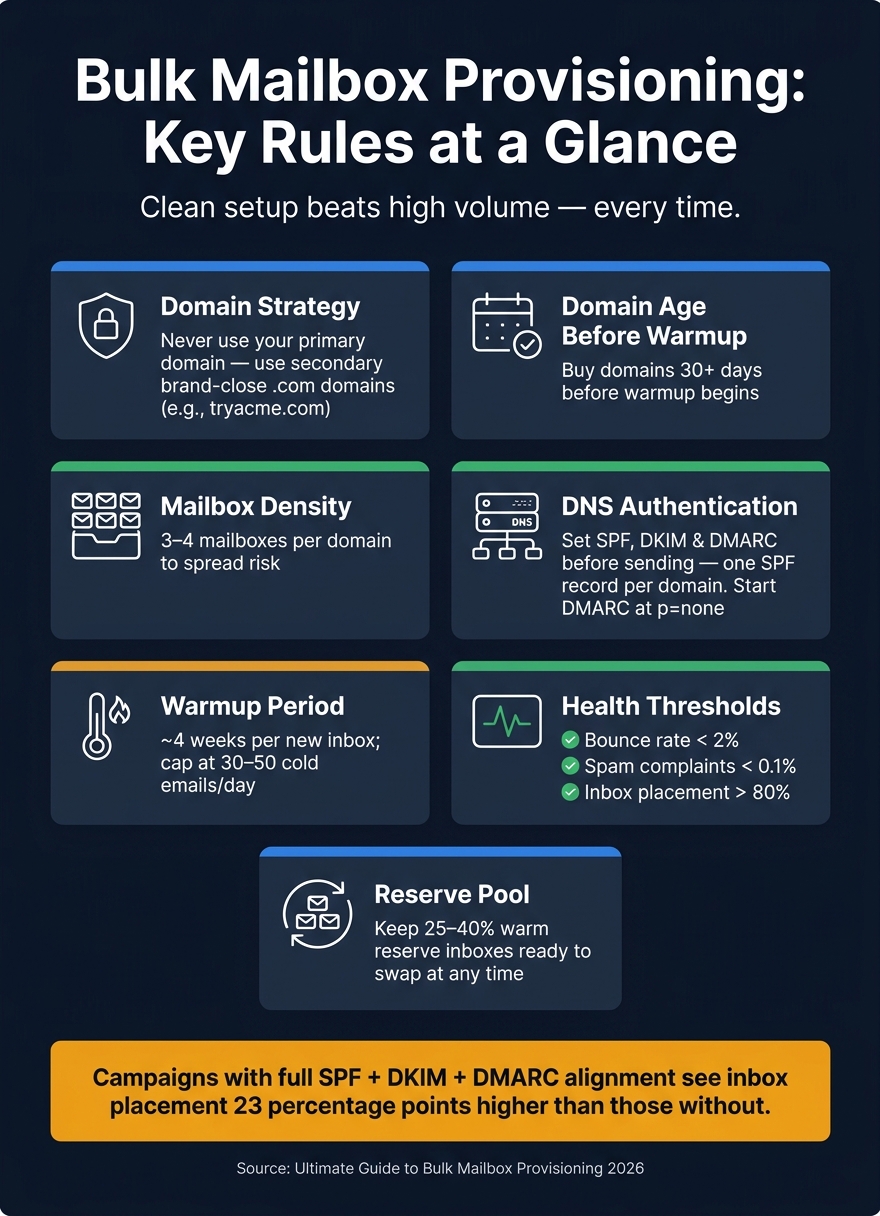
If I had to sum up the article in one line, it would be this: clean setup beats high volume every time.
1. Plan Your Domain and DNS Architecture Before Buying Mailboxes
Your domain and DNS setup shapes inbox placement before you create a single mailbox. So before you spend money on mailboxes, lock in your domain plan and DNS records first.
Choose a Domain Structure That Spreads Risk
Keep mailbox density at 3–4 mailboxes per domain. That way, if one domain runs into trouble, it doesn't drag down your whole outbound setup.
Use secondary .com domains that stay close to your brand name without using your primary domain. Think tryacme.com or getacme.com. Skip subdomains of your main domain because they share reputation with the root domain.
Also, be careful with domain endings. Domains on .xyz, .biz, or .info start behind because they have a stronger link to spam. For mailbox names, go with personal-style addresses like james@getacme.com instead of role-based options like sales1@getacme.com.
It also helps to split sending between Google Workspace and Microsoft 365. If one provider has an issue, your whole program isn't stuck. And don't buy domains at the last minute - get them 30+ days before warmup.
Once your domain map is ready, authenticate every domain before you send anything.
Set SPF, DKIM, and DMARC Correctly From Day One
Campaigns with full SPF, DKIM, and DMARC alignment see inbox placement rates 23 percentage points higher than those without.
Here's what each one does:
- SPF: Says which servers are allowed to send mail for your domain. Each domain should have exactly one SPF record.
- DKIM: Adds a cryptographic signature to outgoing mail. In Google Workspace or Microsoft 365, you need to turn it on manually in the admin panel after adding the DNS record.
- DMARC: Connects SPF and DKIM. Start with
p=none, then move toquarantine, thenrejectonce your reports look clean.
"The most common [error]: multiple SPF records on a single domain (23% of cases), which silently breaks authentication and sends every email to spam." - Levi Nagy, Head of Operations, MailDeck
Once authentication is stable, the teams moving fastest usually stop building DNS records by hand.
Manual DNS Setup vs. Automated DNS Tools
Manual DNS setup takes 30–60 minutes per domain. That's fine for one or two domains. It falls apart fast at scale.
| Feature | Manual Registrar Setup | Icemail.ai |
|---|---|---|
| Setup Time | 30–60 mins per domain | 10-minute onboarding |
| DNS Automation | None | Automated DKIM, DMARC, and SPF setup |
| Fit for Bulk Teams | Not suitable | Built for bulk mailbox provisioning |
For teams provisioning at scale, Icemail.ai handles DNS setup and mailbox provisioning in one flow, which cuts setup time and reduces mistakes.
With domains and DNS in place, the next step is creating mailboxes in Google Workspace or Microsoft 365.
2. Create Google Workspace and Microsoft 365 Mailboxes at Scale
Once DNS is live, the next step is mailbox creation. This part matters more than it seems. The setup method you pick affects speed, consistency, and day-to-day risk.
Native Bulk Provisioning in Google Workspace and Microsoft 365
CSV import works fine for small batches, usually under 50 mailboxes.
For larger Microsoft 365 rollouts, PowerShell is the better fit. IT admins use it to connect to Exchange Online, assign licenses in bulk, and turn on protocols like IMAP across many accounts in one script run. It’s fast once the script is in place. The tradeoff is simple: someone has to build it and keep it working.
In Microsoft 365, shared mailboxes don’t need a license. But for cold outreach, dedicated user mailboxes are the safer pick.
Standardize Mailbox Settings During Creation
Set the same baseline for every mailbox right from the start. Turn on IMAP and SMTP, set the locale to en-US, use person-style names, and turn off external forwarding and catch-all addresses.
That keeps outreach tools connected cleanly and helps inbox behavior stay consistent across accounts.
Manual Provisioning vs. Automation vs. Mailbox Marketplaces
Manual mailbox creation gets slow fast as volume goes up. Managed platforms cut that work from hours to minutes.
| Method | Time for 50 Domains | Technical Skill | DNS Automation | Cost |
|---|---|---|---|---|
| Native CSV (Google/Microsoft) | 12+ hours | Low–Medium | None | About $6–$7.20/user/month |
| PowerShell / Admin API | 2–5 hours | High | Scripted | Per-seat + dev time |
| Managed platforms | Minutes | Low | Fully automated (SPF, DKIM, DMARC) | Varies by provider |
Icemail.ai falls into the managed-platform group. It offers 1-click import/export, bulk mailbox purchasing, and automated SPF, DKIM, and DMARC setup. If your team is provisioning 50+ mailboxes, that cuts out most of the manual work.
After creation, the next risk is ramp-up, which decides whether these inboxes stay healthy.
3. Set up mailboxes for cold email deliverability and safe ramp-up
Creating mailboxes is only the first step. A new inbox still needs the right identity setup and cautious sending limits before you send a single cold email. If you skip that part, it can hit spam fast.
Per-mailbox settings that reduce risk
Set each mailbox up with a first-and-last-name format, a matching from-name, and a plain-text signature. Keep the signature simple: name, title, mailing address, and an unsubscribe link.
For U.S.-based outreach, CAN-SPAM requires both the mailing address and a way to opt out. Also, make sure the from-name matches the display name. Small mismatch, big trust issue.
After the inbox identity is cleaned up, start warm-up before any cold outreach goes out.
Ramp sending volume gradually across mailboxes and domains
New mailboxes don't have sending history yet, so inbox providers look at them carefully. Once identity settings are in place, sending volume becomes the main deliverability risk.
Ramp new mailboxes over four weeks. Keep 30 to 50 cold emails per day as your ceiling. Push past that, and the odds of provider suspension go up fast.
It's also smarter to spread volume across several domains and mailboxes instead of dumping it all into one place. A good range is 2 to 4 mailboxes per domain.
Track mailbox health and replace weak inboxes fast
Once campaigns are live, pay close attention to three numbers:
- Bounce rate: keep it under 2%
- Spam complaint rate: keep it under 0.1%
- Inbox placement: aim for above 80%
If bounce rate climbs above 5%, the domain's reputation is usually hard to recover.
Google Postmaster Tools gives you direct visibility into domain reputation for Gmail recipients. If your domain falls to "Low" or "Bad" status, pause cold sending right away and move those mailboxes into warm-up-only mode for 2 to 4 weeks.
If you're using Microsoft 365, watch deliverability and reputation signals closely. If performance slips, treat it the same way.
Before any send, run the prospect list through a verification tool like ZeroBounce or NeverBounce. Bad data can wreck a healthy setup. And if a mailbox or domain keeps sliding and doesn't recover after a repair window, retire it and swap in a new one.
Once sending is steady, the next move is access control, logs, and deprovisioning.
4. Automate governance, lifecycle management, and team operations
After ramp-up, the bottleneck usually moves from deliverability to day-to-day ops. Once sending is stable, the hard part is staying organized. This layer is what keeps a multi-domain outreach setup under control as volume grows. Without a clear system, mailbox infrastructure gets messy in a hurry.
Build repeatable provisioning workflows
The goal is simple: spinning up new mailboxes should feel like one workflow, not a project that drags on for days. Teams that are further along usually tie domain purchasing, DNS setup, and mailbox creation into one automated flow.
In practice, that means using REST APIs to run each step through a single API workflow. One workflow can register the domain, apply the approved DNS template, create standardized mailboxes, and export credentials to Smartlead or Instantly without manual work. Icemail.ai exposes provisioning actions through REST endpoints, which makes end-to-end automation easy to set up. Use one API surface for provisioning, exports, and webhooks.
One technical detail matters a lot here: use idempotency keys on every write operation. If a network call fails in the middle of provisioning and the system retries, idempotency keys stop duplicate mailboxes from being created. It sounds small, but it saves a lot of cleanup later.
Control access, logs, and deprovisioning
At this stage, governance matters more than raw provisioning speed. Use scoped API keys - read-only for analysts, provisioning-level for ops, and admin-only for infrastructure owners. That cuts down the chance that one person or script breaks something it shouldn’t touch.
Keep separate domain groups per client. Don’t share domains or inboxes across clients. If one client has poor sending habits, shared infrastructure can take the hit for everyone. Audit logs for every provisioning action, domain change, and export give you a clear trail when something goes wrong.
When a mailbox is retired, handle it in a set order:
- Export any active lead conversations
- Set up forwarding to a monitored inbox
- Revoke access
That way, live conversations don’t disappear during offboarding.
Also, treat your mailbox pool like a limited-life asset. Keep a 25%–40% warm reserve so you can swap out degraded inboxes right away without slowing active campaigns.
Conclusion: The simplest path to scalable mailbox provisioning
The simplest way to scale is this: standardize domains, automate provisioning, control access, and retire weak inboxes fast. Get DNS authentication right from day one, standardize provisioning on Google Workspace or Microsoft 365, ramp volume slowly across mailboxes, and automate lifecycle management before scale starts to strain the system.
Icemail.ai handles automated DNS configuration, bulk mailbox creation for both Google and Microsoft inboxes, and 1-click sequencer export in a single platform - cutting setup time by a lot. For teams running cold email at scale, that time savings adds up fast with every new client or campaign.
Related reading
- essential cold email infrastructure setup checklist
- how many mailboxes do you actually need
- buying and configuring bulk email domains
- 30-day domain warm-up step-by-step guide
- automated SPF DKIM and DMARC setup guide
- scaling cold email with multiple mailboxes
- Google Workspace vs Microsoft 365 for outreach
Frequently asked questions
How many mailboxes should I create per domain for cold email?+
Keep mailbox density at 3–4 mailboxes per domain. This spreads risk so that if one domain encounters deliverability issues, it won't affect your entire cold email operation. Using 2–4 mailboxes per domain is the recommended range for maintaining sender reputation while scaling outreach.
How long should I warm up new mailboxes before sending cold emails?+
Warm up new mailboxes for about 4 weeks before launching cold email campaigns. During this period, limit sending to 30–50 cold emails per day. New inboxes lack sending history, so inbox providers scrutinize them carefully. Gradual ramping over four weeks builds reputation and reduces the risk of provider suspension.
What bounce rate and spam complaint rate should I target for cold email?+
Keep your bounce rate under 2% and spam complaint rate under 0.1%. If bounce rate climbs above 5%, domain reputation becomes very difficult to recover. Also aim for inbox placement above 80%. These metrics are critical indicators of mailbox health and should be monitored weekly.
Should I use my primary business domain for cold email outreach?+
Never use your primary business domain for cold outreach. Instead, use secondary .com domains that stay close to your brand name, like tryacme.com or getacme.com. This protects your main domain's reputation. Avoid subdomains of your primary domain since they share reputation with the root domain.
What DNS records must be configured before sending cold emails?+
Set up SPF, DKIM, and DMARC records before sending any cold emails. Each domain needs exactly one SPF record listing authorized sending servers. DKIM adds cryptographic signatures and must be manually enabled in Google Workspace or Microsoft 365. Start DMARC at p=none, then move to stricter policies after reports look clean. Campaigns with full authentication see inbox placement rates 23 percentage points higher.
How far in advance should I purchase domains for cold email?+
Buy secondary domains at least 30+ days before starting warm-up. Domain age is a trust signal for inbox providers. Purchasing domains well in advance of your campaign launch helps establish legitimacy and improves deliverability from the start.
What percentage of reserve mailboxes should I maintain?+
Keep a 25%–40% reserve of warm mailboxes ready at all times. This allows you to quickly swap out degraded or flagged inboxes without slowing down active campaigns. Treat your mailbox pool as a limited-life asset and plan for regular rotation to maintain consistent deliverability.